Vector Offroad JK E-Dock RAM Mount dashboard thingy
Last weekend I spent an hour installing the simplest + coolest interior accessory for my Wrangler - the Vector Offroad E-Dock. Read on for install instructions and a list of components...
I've officially given up on posting Jeep-accessory write-ups in any kind of sane order - the 5 half-written posts that I've got sitting in my 'Drafts' folder may be stuck there for a long time!
Vector Offroad makes a few unique products down in lovely Utah. I installed one of their tailgate tables a couple months ago (another blog post stuck in the 'Drafts' chasm), and am planning to buy a set of their UFO discs to replace the now-pointless rubber bumpers on my hood and rear gate, but most recently installed their E-Dock.
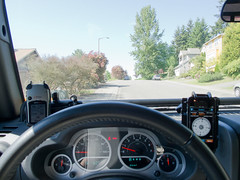
The E-Dock doesn't exactly 'do anything' by itself. It just provides a (slick) way for mounting RAM Mount bases without relying on suction cups, gluing anything to the dash, or drilling through the plastic. Once you have RAM bases you can pretty much do whatever you want.
I've driven on some rough roads and taken some speed bumps 'at speed' and everything is staying nice and tight. It took a couple tries to get the mounts positioned correctly, there is a minor amount of flexing in the arms when you hit bumps so my initial alignment had the radio too close to the CB and the camera too close to the windshield, so both would rattle and hit.
You'll notice that my E-Dock doesn't look quite like the one in their pictures. I had them make a semi-custom version, lacking the shelf and most of the front hoop, to accommodate another project I'll be working on this summer. The seemed happy to assist in getting me the customized version, and there was only a minor delay waiting for their next production run compared to getting a pre-produced one. (I can't find my receipt, but I'm pretty sure there was no extra charge either)
Theirs, with a center shelf and front rail :: Mine without that stuff
 ::
:: 
In this post I'll be using some of the pictures from their full-color PDF (all the ones with the red writing in on them), rather than taking all my own pics. I was impressed by the quality of their instructions - compared to many other Jeep part suppliers having 'any' instructions is a surprise, but having online instructions with full color photographs? Rare!
Part 1: Installing the dock
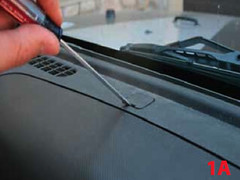
First, remove 3 parts of the dashboard:
Two little screw covers, one from each side (I used a flat head screwdriver because they were really stuck in there, and I didn't care about scratching them since they won't be reinstalled)
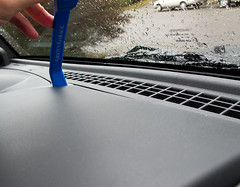
And the radio's top cover. The blue sticks in these pictures are body panel tools from Griott's Garage, they are firm plastic but soft enough that you don't run too big a risk of messing a panel up. There are a couple different shapes to fit in various cracks. The top panel is just held in place with some metal clips, not hard to slowly pry it up.
Once all the clips are popped up, slide it forward (towards the center of the cab) to unlatch the front, and then lift, rotate, and prop out of the way. Note the compass wires that you need to be careful of, don't go yanking it around.
With the top removed, you have access to two hex head screws holding the trim on at the top. I believe it was an 11mm socket driver I used.

Once those two are removed you can remove the air vents, by twisting them (the outside just an inch or so and then they slide out.

Now you can start to pull the trim forward. It is connected with a couple of clips as well. You aren't going to remove it completely (there are more screws down by the A/C control that you don't need to worry about.

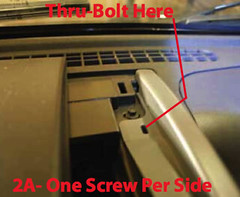
You just need to pull it far enough forward that you can access the 4 hex head bolts on the radio (2 per side). Same head size as the previous two. The top two are easy to remove, the bottom two are a little tricker. You can either try to wiggle the driver through the opening like in my picture, or use a small ratchet through the open side.
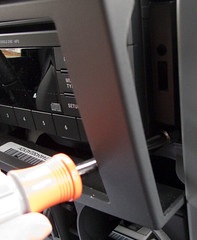
With the screws removed, apply firm pressure to the top of the radio (wherever you can grab hold) and pull it out a little bit. It needs to come out far enough that your hand can get behind it to push the screws in to the slots, and get a little screw driver in there to hold it while tightening the nut. If you are clumsy or have large hands you may need to pull the front plastic off farther, which may include popping the bottom mesh net part out with your trim removal tools.
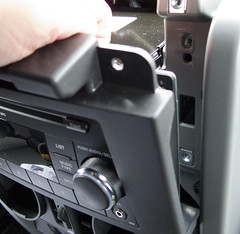
Now that the radio is out, push bolts in to those slots from the bottom up, drop a support bracket on it, and then put a nut on it. Be careful when you are doing all this that you don't drop the bolt or nut, it will be a pain to get it out.

When you tighten these down, push the support leg out so that it is as flush as possible with the dashboard trim piece. If you don't do that correctly the radio cover won't fit back on very well.
Now you can move on to mounting the troublesome front support bars. If you have your Jeep set up to fold the front window down, now would be a great time to use that feature. Unfortunately since Chrysler 'design sensibilities' have made folding it down take approximately 80 times longer than in pre-JK Jeeps most of you won't have that option.
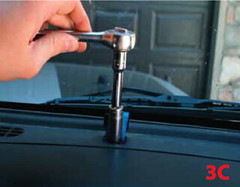
Down in those two holes you opened up at the beginning are some upward-facing bolts. The nuts on these bolts go really far down so you'll need a deep well socket and an extension to reach them. Vector Offroad's suggestion to use a 1/4" drive ratchet is spot on, you are very close to the windshield.
When you are removing these buts do not actually remove them! Keep using your finger to check how far up the nut it. As soon as it is flush with the end of the bolt stop using the ratchet (unless you have one of those nice magnetic sets) otherwise you'll end up dropping the nut in to the dash where it will be impossible to retrieve. Instead, use one of those telescoping magnetic 'pick up' tools

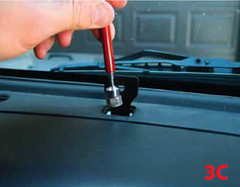
Slide the bracket down in to the hole, use the magnet to start threading the nut. Then put a piece of painter's tape on the bracket so you don't scratch it up and then you can move back to the ratchet. You'll have to keep hold of the bracket so it stays aligned, and depending on the size of your socket you might have to really push hard on the bracket to get the socket out of the whole once it is tight.
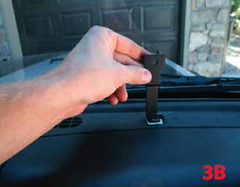
Put some tape
With the bases where you want them tighten them up. Tightening the bottom nuts can be frustrating when the bar is mounted, so try to do that now. Moving them a little bit after it is installed is not hard because you just need to loosen the top nut.
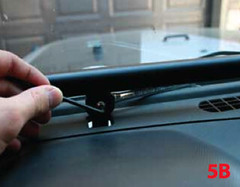
Now start mounting the dock. I loosely attached the two center/radio points first, and then moved to the end/windshield points.
Be very careful. I ended up dropping one of the bolts down in to the dash behind the steering wheel. There are all sorts of metal plates and crap in there, so I couldn't get it out. Appropriately sized bolts can be found at Home Depot - if you want ones that match (curved head, hex drive) those are over in the 'specialty fastener' drawer.
Part 2: The RAM Mounts
I've used a lot of different 'arm' mounts over the years, and these are by far the most secure and the most versatile.
There are a ton of different mounts available from RAM. The E-Dock is basically a 1 inch diameter tube, so you'll use the RAM-B-231U base for everything.
I got some of each size mounting arm - the short, normal, and long. The long arm turned out to not really be useful, luckily I only bought one of those. The short arm is useful for things that you want to mount right up on the window.
For the Garmin eTrex they have a specific mount -
- Base - 1" tub mount - RAM-B-231U (this is the ball that goes on the E-Dock)
- Now one complaint I have is that the u bolts are shiny and that is annoying since nothing else is stainless steel on my dash. RAM also has a black zinc version instead of the stainless steel, that would have looked better - but it isn't rust proof)
- Standard length arm - RAM-B-201U (this is the adjustable arm)
- Ball Plate - RAM-B-238U (this is the ball that attaches the arm to the device mount)
- Garmin eTrex holder - RAM-HOL-GA16U (this is the actual piece that the Garmin goes in, there are a bunch of different versions so check their site if you don't have exactly the eTrex Vista HCx)
For the iPhone 4 I used one of their universal fit mounts rather than their iPhone-specific mount which does not accommodate cases
- Base - 1" tub mount - RAM-B-231U
- Standard length arm - RAM-B-201U
- Ball Plate - RAM-B-238U
- Universal Clamping Cradle - RAM-HOL-PD3U (this has a spring-loaded clamp at the top that really secures the phone)

The GoPro camera uses a combination of GoPro adaptor and RAM tripod mount
- Base - 1" tub mount - RAM-B-231U
- Short length arm - RAM-B-201U-A
- Ball Plate - RAM-B-238U
- Camera Stud - RAP-B-366U (there are a couple shapes/sizes, this one is a match for the GoPro camera mount)
- GoPro Camera Mount - tripod mount (this setup is way more secure and easier to adjust than the GoPro-provided windshield mount)
The Midland handheld uses on of their universal mounts
- Base - 1" tub mount - RAM-B-231U
- Standard length arm - RAM-B-201U
- Ball Plate - RAM-B-238U
- Universal Finger Grip - RAM-HOL-UN4U (this has a bunch of different pieces that you put together to match whatever radio you are trying to mount, it is very secure even though nothing wraps around the front of the radio)
The Spot (which I'll make a blog post about!) has a specific mount
- Base - 1" tub mount - RAM-B-231U
- Short length arm - RAM-B-201U-A
- Ball Plate - RAM-B-238U
- Spot Mount - RAM-HOL-SPO2U (Like the GPS there are different mounts depending on which SPOT you have, so check their site)
I bought all of my RAM parts from The Mount Depot which had the best price+shipping costs, plus they had everything in stock to ship fast.
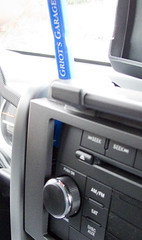
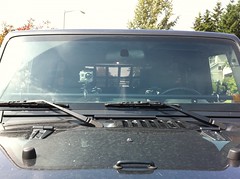
And lastly a view from the front, you can see the stainless steel u bolts look a little out of place, but overall it looks nice.
![]()
No comments:
Post a Comment