Cobra 75 and Firestick Jeep CB Install
Part of being bad-ass is being able to outwit the 5-0. One way to do that, and make it easy to keep in touch with other folks in your caravan, is to install a Citizen's Band AM radio set.
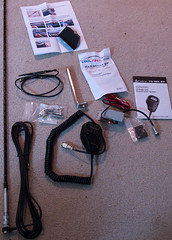
I ordered a Cobra 75wxst all-in-one unit, a Bullfrog/Toad CB mount, a Firestik 2 antenna, and a CoolTech spare tire antenna mount kit. Read on for an installation write-up.
Installation is really 4 parts: Mounting the CB, mounting the antenna, running the lines, and tuning the system. Luckily those 3 parts are all discrete enough that you don't have to do that at the same time - it was cold and rainy the weekend I put this stuff together.
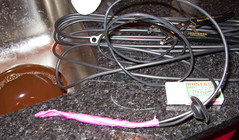
First, all the parts. A Cobra 75 WX ST that I got for 'free' (hurray Chase Amazon Visa rewards!), a 3 foot Firestick 2 with quick-disconnect and cable, a CoolTech sparetire mount bracket, and a radio mount CB holder from Toad.
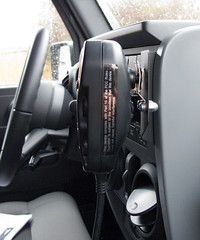
Mounting the CB Handset
This part is easy to do even in the cold rain, since you are entirely in the cab the whole time.
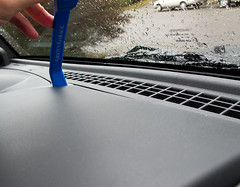
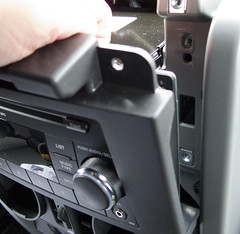
First thing to do is pry off the radio's top cover. The blue sticks in these pictures are body panel tools from Griott's Garage, they are firm plastic but soft enough that you don't run too big a risk of messing a panel up. There are a couple different shapes to fit in various cracks. The top panel is just held in place with some metal clips, not hard to slowly pry it up.

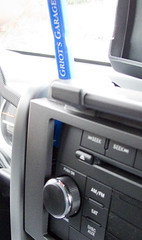
Once all the clips are popped up, slide it forward (towards the center of the cab) to unlatch the front, and then lift, rotate, and prop out of the way. Note the compass wires that you need to be careful of, don't go yanking it around.
With the top removed, you have access to two hex head screws holding the trim on at the top. I believe it was an 11mm socket driver I used.

Once those two are removed you can remove the air vents, by twisting them (the outside just an inch or so and then they slide out.

Now you can start to pull the trim forward. It is connected with a couple of clips as well. You aren't going to remove it completely (there are more screws down by the A/C control that you don't need to worry about.

You just need to pull it far enough forward that you can access the 4 hex head bolts on the radio (2 per side). Same head size as the previous two. The top two are easy to remove, the bottom two are a little tricker. You can either try to wiggle the driver through the opening like in my picture, or use a small ratchet through the open side.
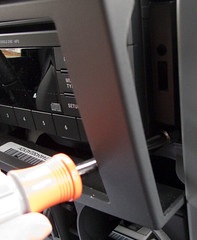
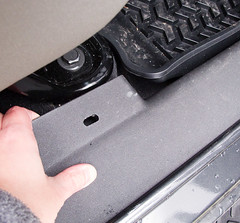
With the screws removed, apply firm pressure to the top of the radio (wherever you can grab hold) and pull it out a little bit. Doesn't have to come out far at all.
Just far enough that you can see the little 'spike' piece fully exposed.
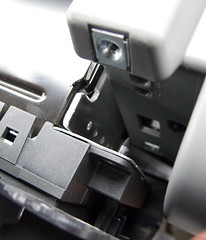
Wiggle the handset mount behind the radio. It has 3 holes, two will line up with the screw holes, and one will slide around the little 'spike'.
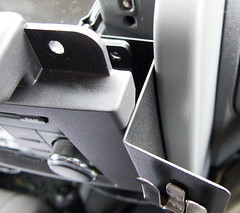
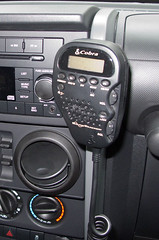
Reattach everything in reverse order, and you're left with a nice looking sturdy CB handset mount that does not interfere with radio controls.

Mounting the Antenna
The only hard part about mounting the antenna is getting the antenna cable through the rear gate and in to the cargo area. The rest is pretty trivial.
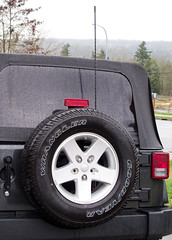
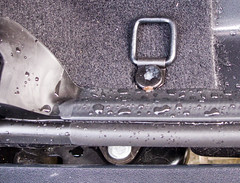
First, remove the spare tire. Your lug wrench is in the 'hidden compartment' in the cargo area. Once the tire is off the mount, you'll see the big plastic offset mount bolted to the gate, and a rubber grommet near it. That's where we'll be mounting the antenna.
Remove the grommet from the outside. I couldn't get my fingers under it, but pressing firmly in the center made the edges raise enough that I could start slowly prying it free.
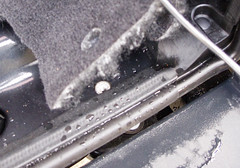
Open the gate, and you'll see the big plastic trim panel near the top of it. Pry that off, starting with the clips on the bottom.
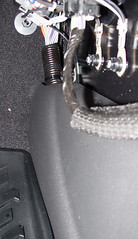
The first big hole (closest to the hinge side) is where the cables will emerge.
Now prepare for the hardest part of the antenna install (hardest part of the entire CB install actually). Poke a 1/4 inch hole in the center of the grommet. (the rubber will press back on itself, so the hole will look way smaller than your cable) I started trying to use an awl but that was too hard, eventually switched to a drill bit and rasp. Put the grommet in the hot water and let it sit. Fill a bowl with hot water. Tape the end of the ground cable (the side without the the connector) about two inches below the end of the antenna cable (the side with the mini-connector), and spiral the tape up to make a smooth unit, continue the tape beyond the end of both wires to make a thin tail. Take the grommet out of the water, and pour some wire pulling lube or regular old dish soap in the hole. Use something thin (like a match stick) to push the electrical tape tail through the hole - you want the tape to start on the 'outside' of the grommet pushed through to the 'inside' (refer to the picture, if you do this backwards you'll be very sad when you eventually get back to your Jeep). When the tape tail stick through use some plier to grab on and slowly pull it through. This is going to be a pain in the butt, getting both those wires through the tiny rubber hole will make you crazy. You don't want a big hole though, otherwise water will leak through. Eventually you will succeed and have ~ 2 feet pulled through. At this point I'd suggest a beer before continuing.
Return to the Jeep, and bring a buddy. Insert the still-taped cable pair through the exterior hole.
Have your buddy wiggle the cable around until you are able to grab it through the inside hole. A pair of thin needlenose pliers helps here. Unwrap the tape to separate the cables, and pull almost all of the cable through. I found leaving ~2 feet of each cable on the outside worked.
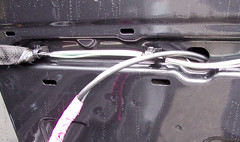
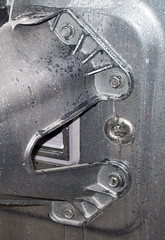
Decide if you want to mount the bracket 'up' or 'down'. I went with 'down' so the antenna wouldn't be quite as high. Put a washer on one of hte antenna bracket mounting bolts, slide the ground wire connector on, slide the bolt through whichever bracket hole will be the 'top' in your config, then slide the bracket spacer on.
Remove the two spare tire mount mounting bolts that are above/below the grommet hole. Barely attach your new top bracket mounting bolt to the top hole. Pull the ground wire the rest of the way through the hole (leave the ~2 feet of antenna cord hanging still), and press the grommet back in to place. Put the bottom bolt (with washer and spacer) in place. Arrange the two cables as shown in the picture (ground on the inside of the mount, antenna on the outside). Tighten both bolts down. As you turn the top on, make sure the ground connector stays pointing in the right direction.

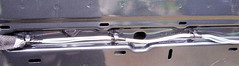
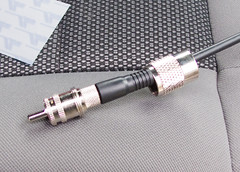
Connect the antenna base to the mount as shown in the picture. (cable boot, plastic spacer, bracket, plastic spacer, washer, antenna base, quick release base). Pull the remainder of the antenna cable through the grommet, and tighten the antenna base connections down.

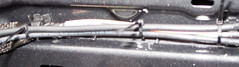
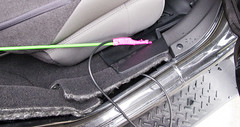
On the inside of the gate, zip tie your cables to the existing cables, and to the inside of the webbing that gets the existing cables in to the cargo area.
Snap the trim piece back in place, and things look nice.
Mount the antenna to the quick release, put the spare tire back on, and ta da, nice looking antenna addition is done!
Running the Lines
Now on to the easy but time consuming part that changes whether you have a good install or a bad one. Getting the cables where they need to be, without being visible.
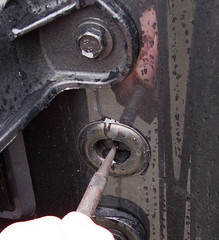
First, take care of the antenna bracket ground line. We'll use one of the tie-down brackets for this, as I don't have a subwoofer in my cargo area to connect too.
After unscrewing the bracket, start peeling the floor and wall carpet up. Trim the ground cable so it reaches the bolt hole in the floor, while still being long enough to hide behind the carpet. Strip a small amount of insulation off, crimp the connector on, place it on the floor, and screw the tie-down point & carpet back down on top of it.
Next, start routing the antenna cable around the top of the cargo area, but pulling the carpet back and following the existing cable bundle.
Bring it down to the bottom part of the rear door. Use zip ties to the existing cable bundles were possible.
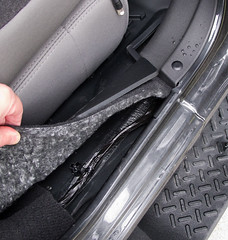
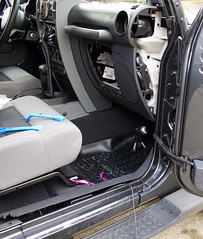
Go to the front door and start pulling out the plastic rivets that hold the trim pieces down.

There are a pain, but you'll need to fully remove 3 of them. Two on the part that covers the seat belt area, and one from the floor trim, near the front mounting bolts for the chair.
Your goal is to get your cable to come out the same place where the original cables come out, up under the dash.
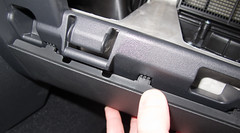
Since I was in the front removing panels, I took a break from running the cable and removed all the other panels I'd eventually need access too. Remove the glove box by opening it, and then squeezing the sides near where you see the 'plastic cylinder' in the picture. There is one on each side, and once cleared from the dash you can pull the entire unit out.
Remove the panel below the glove box, by reaching inside and undoing a couple clips on the top, then gently prying the rest out.
Remove the side air vent (same slight-twist to unlock as the center ones used). Reach through the hole and push the side panel out.

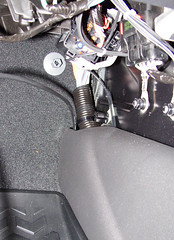
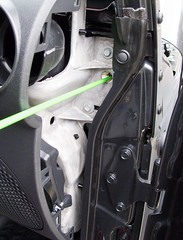
Back to cable running. In order to get from the back seat to the front seat through the trim, and without removing a ton more stuff, I'm using my household cable tools. The green stick in the picture is a fiberglas rod ("fish stick", etc) used for getting cable through walls and attics. I've taped the end of my antenna cable to it, and push it through the same area that the original cables go. Be gentle, back it out a few times, eventually it will go through following the correct path.
Push the stick through far enough that you can unwrap the tape, and then pull the stick back out. Pull the cable the rest of the way through, and zip tie the part in the rear.
A combination of pushing, tucking, and scowling will eventually get the cable through the last foot and out where the original bundle goes. You'll end up with a foot or two of antenna cable dangling in the foot well now.
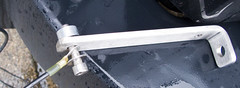
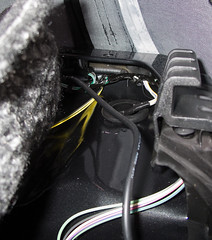
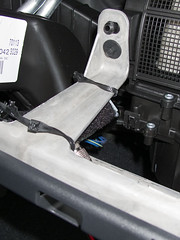
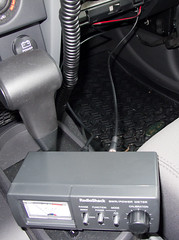
Time to mount the connector box for the CB. I put industrial velcro across the bottom, and the other part of the velcro on the bar I was going to mount it to. I also used a pair of long zip-ties to hold it in place. I didn't want to mount the box with sheet metal screws in case I decided to move it.

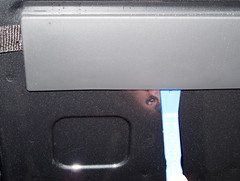
Here is the bar beneath the glove box that I mounted it too. The power line and antenna connector are facing the outside of the vehicle, the box is mounted on the 'inside vehicle' side of the bar (that bar has a rib on the bottom, it isn't just flat). The connector for the CB handset hangs down next to the center console. It has provisions to hard mount it, but I have elected not to do that - no compelling reason for me to drill a hole for the connector.
Go ahead and attach the full size antenna connector to the mini-connector on yoru antenna line.
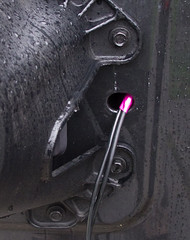
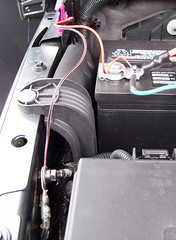
Move on to routing the power lines now. Near the side panel we removed there will be a hole filled with yellow foam. (I also partially disconnected the door retainer strap so the door would be out of the way. Just disconnect the first hook, not the entire thing or the door will slam in to the side of your Jeep!) Open the hood. Stick your fish stick through it, the foam will easily break away.
Eventually (again, you'll have to back out and go forward a few times to get the alignment right) the stick will come out the front.

You can route the CB power lines up through the foot well to the side panel. Follow the existing cables, and make use of the open areas behind the trim panels. Stick the power line through the hole and bring it out the front of the vehicle. I wired directly to the battery (the line is fused) and to the ground point in front of it. This is temporary cabling until I get my battery tray and accessory fuse block.
Now finish zip tieing everything down, reattach all the trim pieces except for the two glove box parts, and tuck all the carpet back in. Now you're done running your wires, congrats!
Tuning the System
CB radios don't work very well if you don't 'tune' the system. You need a SWR (standing wave ratio) meter to do this. RadioShack sells one for around $50 that is usually sufficient. You'll also need to pick up a short (1 foot is enough) antenna cable to connect the tester.
Attacht the short cable to the CB connector box and the 'input'/'radio' connector on the SWR meter. Connect the actual antenna cable to the 'output'/'antenna' connector on the meter.
Now follow the instructions on tuning your antenna. I found the instructions (and other documents) on the Firestik website to be vastly superior to the instructions included with the SWR meter.
Once you're tuned, disconnect the short cable & tester, connect the real antenna cable to the CB box, put the trim piece and the glove box back in place, and you're done!
![]()
2 comments:
Great install, can you tell me were you got the CB headmount from and the cost like tng.o use one like that to prevent drilli
Toad on JK-Forum.com sells them.
They have a couple different versions - the one I have, one that has two mounts for the CB and an iPod, and also a mount that fits on the left side of hte radio.
Post a Comment