Jeep Wranger Benchmark Dual Battery installation
Zombie Killer got herself a power upgrade - two Optima D34 Yellow top batteries replaced the single original battery. Now the chance of having a dead battery is extremely low, even if I've been running a load with the engine off in the dead of winter.
Read on for a pictorial walkthrough of my install.
Lights, compressors, CBs/radios, and especially winches can really put a strain on a battery. The stock Jeep alternator is fairly beefy, but the battery is not so hot, and the alternator doesn't work when the vehicle is off anyway. I decided a dual-battery system would be one of my first 'big' mods. Replacing the single battery with a pair of batteries allows one to power all the accessories and with a smart battery controller it can be cut off from the main battery when the power starts to drop below cranking voltage. If someone the main cranking battery gets too low (let the regular headlights on, it was extremely cold, etc) the backup battery can be used to "self-jump start." I went ahead and upgraded from the normal OEM battery to Optima 'yellow tops' which are pretty rugged, can handle some deep discharges, and don't mind very low temperatures. Having a pair of quality batteries should mean I never need to get a jump start no matter what 'dumb' thing I do!
There are a couple different dual-battery trays for the Jeep Wrangler JK, but I went with the one from Benchmark Designs. They are active on the forums, local, and actually care about the products they ship out - unlike some of the other 'big name' Jeep accessory companies that off-shore everything with no quality control. Of their three models I picked the one they now call 'Stage 3' - the difference between the 3 versions is the wiring. 'Stage 1' the batteries are just permanently connected to each other, 'Stage 2' isolates the cranking battery when the ignition is off, and 'Stage 3' has an isolator that actually monitors the voltage in the batteries and 'does the right thing.'
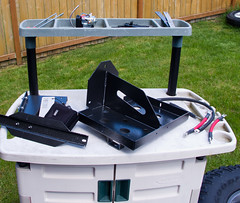
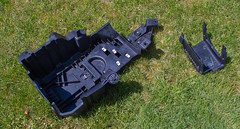
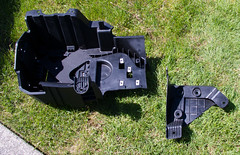
In this first picture we see all the stuff included in the tray package. There are three categories if items - the big tray in the middle, the wiring (the silver 'thing' on the top shelf and the wires on the bottom), and support pieces (everything else).
Note: If you have questions/comments you can leave them on this blog, but a better source of discussion would be this thread on the JK Owners forum
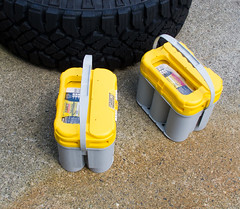
The yellow tops. They have an interesting design where you remove the handle, and then remove the protective cap, then the cap can connect in two different ways to the bottom of the battery to fit your mount. These things are stupid-heavy, be careful when lifting them - since I was lifting them higher than my chest and then out and then down in to the engine bay I ended up straining my back for a week. The weight also means you really have to pay attention when buying them online - a good deal might be horrible when you discover the shipping fee.
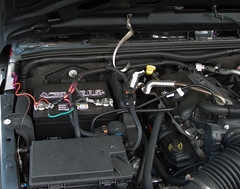
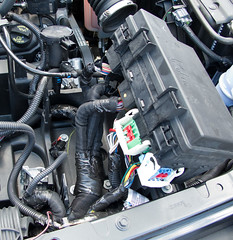
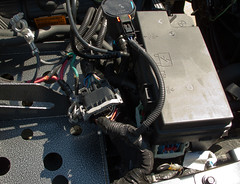
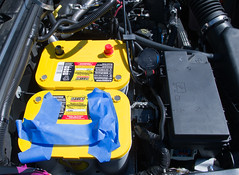
Here is a picture of the stock battery layout. The thin red wire coming from the edge of the body is temporary wire for my CB. All the others (green, multiple black, multiple red) are what comes from the factory. That flat silver braided line is a ground strap connecting to the metal hood.
Zombie Killer is lifted (>3.5 inch Teraflex) and has larger (35 inch) tires so I needed to pull out my work platform to stand on.
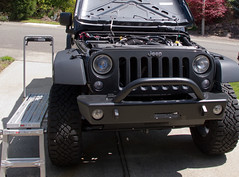
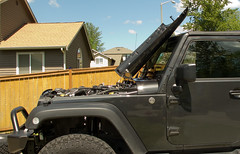
Gotta love the rugged engineering of the Jeep! Instead of using the hood prop rod, I folded a beach towel, put it on the top of my front windshield, and put the hood all the way back. Since we'll be working way up near the hinges this is very helpful. You get way more light, more elbow room, and you don't whack your head constantly.
The instructions that came with the kit were very good, and had b/w pictures in them, so I won't be covering every single step in detail, just an overview with some larger color pictures and some personal comments that hopefully help whoever finds this in their search.
First we have to remove the old battery. Disconnect the original battery cables (removing the entire clamps gets it done fast). I put some painters tape over the red power connector to help prevent accidental electrocution. Use a an extension on your ratchet and unbolt the battery retainer as shown in the pic. I didn't write down all the sizes, but I had 8, 10, 12, and 14 mm sockets out.
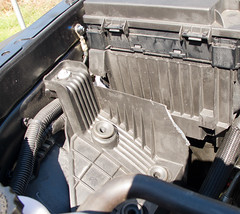
Remove the battery and you'll see a big plastic tray the held it, it is bolted to the firewall (the wall that separates the inner cab from the engine bay) and several places along the side of the engine bay body.
Get the air box out of the way. I took the top off (4 metal clips, the ones you pop to change the filter) for a little extra elbow room, but it probably wasn't necessary. You use a flat head screwdriver to loosen the silver band clamp you see in this picture. Don't undo it all the way, just loose enough that you can wrestle the flex tube from the molded airbox pipe. Grab the bottom of the air box and gently pull it up, you can see two of the three rubber sockets that hold it in place in the lower-left of the picture.
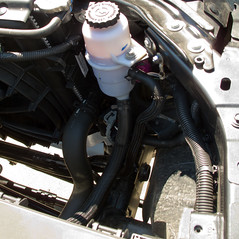
Next to where the airbox was you'll see the power steering fluid bottle bolted to the wall. Remove the bolt and push the bottle to the side.
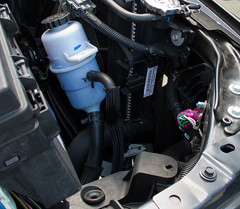
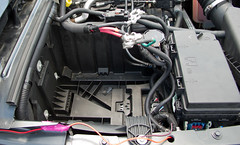
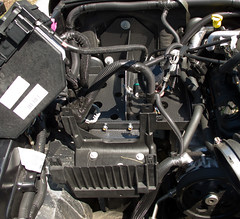
Back over to the battery section, you need to disconnect several wiring harness connectors, the evap purge solenoid (the round vessel you see just to the right of the engine oil cap in this picture), and four plastic clips around the fuse box. Once that's all disconnected you can move the fuse box and the wiring out of the way. (do not disconnect the cables on the bottom of the fuse box, that is the path to sadness, you should be good with how my picture is) Then disconnect the black ground line connected to the side of the engine bay (near where that thin pinkish-black wire in my picture is, you won't have that pink one though)
Now go all along the big plastic battery tray and remove the bolts that mount it. Keep track of everything you remove, some of it you'll reuse! Wrestle with it a bit, don't get carried away because you don't want to yank any of the wires, and eventually it will come out. Disconnect the small plastic part that held the fuse box from the larger tray while you're at it.
At this point lots of stuff is just hanging everywhere, that's okay make sure you don't yank on anything. Look at the firewall and cut the piece of "T-shaped" insulation that separates the three original mounting bolts - a box cutter does fine for this.

More gentle wrestling. First get the tray down in there and bolt it to the firewall. For many of these steps you want to only loosely tighten things, as with most installations you don't want to snug things down until everything is in alignment. Bolt the fuse box carrier to the new battery tray piece, and bolt that to the main part of the tray.
Add the new support arm by using a bolt hole behind the shock tower. I decided to wait until I got my lift done so there would be room to work down in there, otherwise the original springs are all in the way.
Look up and you can see where the new support arm will connect to the bottom of the tray. Having a trained octopus pet will make this considerably easier.
Once all the bolts are in, go back and start tightening things up. Then you can clip the fuse box and the couple of harness connectors back together. You'll note that you can reconnect the evap purge unit but there is no longer a place for it to mount to. When the batteries get installed you can wedge it between the batteries and the fuse box so it doesn't move around, but it is still 'no mounted.' This is 'by design' and one of only two complaints that I have.
Remount the power steering fluid bottle to the body tab.
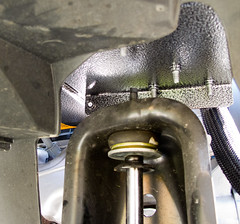
Now here is the first and only step that 'commits' you to the project. Everything other than this is non-destructive to put back (or doesn't matter, like the little piece of insulation we cut off). You have to cut the airbox mounting piece from the rest of the tray. Benchmark Designs has you reuse the original airbox mount, rather than provide a custom one, to make aftermarket airbox mods (like snorkels) work with this kit. Cut it so that the mount has a the verticle piece like shown in my picture. You just need a little hacksaw, the plastic isn't hard.
Mount the now-separate airbox mount to the two original bolt holes that it can still reach. You may have to trim some of the edge where you were cutting to get it to fit correctly.
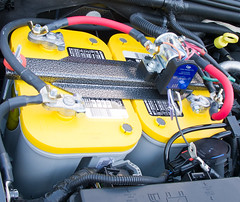
Carefully drop the batteries in to place, in the orientation shown in my picture. They will try to yank on wires and hoses, they'll also try to crush your hands. I'd suggest leaving the handles on while doing this, they aren't hard to remove when you have them in place.
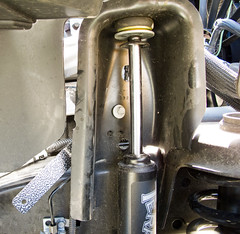
An important step, and my second complaint, is getting the battery stablizer bar+isolator mount in place. You have to drop these really long hook bolts down through some eyes on the tray, and that almost literally was the single longest step in the entire process. There has got to be a better way to secure the bar, but I'm not sure what it would be.
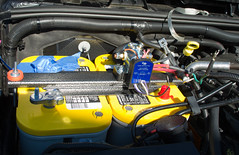
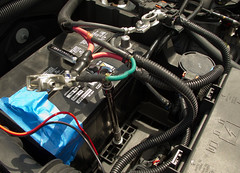
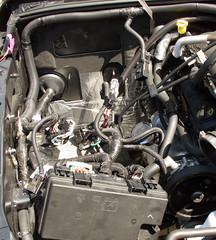
Once the bar is in place, bang the terminals on, and wire up according to the instructions (and common sense). I took this picture prior to being 'fully done' so you still see the braided ground strap uncovered, you will need to insulate it since it now can potentially lay down on top of the battery terminals. You also see the three wires coming off the isolator in 'temp wiring' condition - the black one you will connect to ground, and the purple and white ones you'll probably just cap off, but I'm going to wire them to an override switch in the cab.
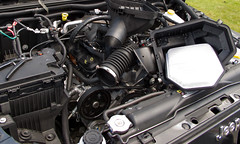
Pop the airbox back in place, and reconnect its tubing, and you are done - other than connecting all of your accessories to the 'accessory battery' (the one near the edge of the vehicle, the 'cranking battery' is the one near the engine, all the OEM items connect to it).
Note: If you have questions or comments you can leave them on this blog, but a better source of discussion would be this thread on the JK Owner's forum
![]()
3 comments:
Good stuff man! I too am building my 2011 JK into a "zombie response vehicle." :) Love the dual batteries and you have done many of the same mods I will be done. Let me know if you need any custom stickers or whatever as I own a sticker shop. Would love to see more of your build. I'll try to find you on facebook or whatever. My s/n on jk-forum is jeepface.
Thanks!
-Mike-
Nice write up. Just picked up the stage 3 battery system from benchmark designs. Nice to see that you're on JKOwners.com. The best JK internet resource, bar none.
Rubirob
This is a very comprehensive article wherein you can learn a lot about working with a Jeep Wrangler. I appreciate this much.
Post a Comment